
A few weeks ago I published an article about maximizing SEO efforts in WordPress. I had promised a follow up post to cover additional features like automatically populating meta titles and descriptions, configuring the permalink structure, integrating Webmaster Tools, and creating XML sitemaps.
Today we’re digging deeper into WordPress SEO tools and covering all those additional SEO goodies. Don’t worry, I won’t go so far into each topic that I lose you. We’ll go just deep enough to get your feet wet and headed in the right direction.
If you didn’t read the original post, you might want to catch up and browse through it before reading today’s information. If you prefer to ignore that suggestion, well that’s fine too.
Read the original post -> Maximizing SEO in WordPress With Yoast
Today we are covering aspects of the Yoast SEO plugin that I frequently see people missing. When I say frequently, I mean like 9 out of 10 users. None of these settings are difficult to set up, so don’t be fearful. It is just a matter of knowing what you’re missing and jumping in and getting the list done.
Are you ready? Let’s get rolling with part two of our education into WordPress SEO tools.
Automatically Populating Meta Titles and Descriptions
Did you know that you can automatically populate meta titles and descriptions in pages, posts, categories, and tags? Yep, a lot of people don’t either so don’t feel bad. It’s so important, it’s the one thing I make sure I do for every client.
As a reminder to readers, meta titles and descriptions are used by search engines. These pieces of data are displayed in the search results pages for individual queries or user searches:
- Meta title (aka an SEO title) – A meta title is what the search engines use as the title of a piece of content. A keyword phrase should be found within this text. The phrase should be more than 40 characters but less than 70 characters. If you go more than 70 characters, the search engines will cut off your title, which could create usability problems.
- Meta description – A meta description is what the search engines use as the description of a piece of content. A keyword phrase should be found here as well. This text shouldn’t be just a bunch of words. It should be a cohesive sentence or two that is compelling in nature.
Both meta title and description play an important role for search engine optimization. They help the search engines distinguish one piece of content from another and thus help in overall ranking.
While Yoast offers content specific definition of meta titles and descriptions, we marketers know that is unrealistic. Real users don’t add this for every page or post. I absolutely want them to, but they forget so I always want a back up.
If Yoast is properly configured, the plugin will automatically populate these fields in the event the user forgets. Again, most websites I review have no meta at all because the user forgets to do it. Thus we all really need a back up to cover us.
To configure this option, simply head over to Yoast plugin settings within your WordPress dashboard. You’ll find it under SEO -> Titles & Metas -> Post Types.
The magical part of the text is the %%excerpt%%. It’s so simple, yet so powerful. That little bit of text tells Yoast to create a meta description from your content should you forget. This means the plugin will take the first set of available text and apply it to the meta description.
The good news is it will make sure you are within the character allotments as dictated from the search engines. The bad news is it will cut you off in mid-sentence to meet these requirements. Given the alternative of no description, I’ll take the cut off.


Pages and posts look good, but we’re not done. We also want to configure this for categories and tags.
To configure this option, simply head over to Yoast plugin settings within your WordPress dashboard. You’ll find it under SEO -> Titles & Metas -> Taxonomies.


Did you notice that the categories and tags are different than what I had as posts and pages? That is because category and tag pages don’t have real content. They have post lists, so I want them to have a head start, but in an automated manner.
For tags I have just set the meta description to pull in the term and add in additional text so it forms a complete sentence. I’ve done this because I create tags on the fly inside posts. I don’t want to have to return and actually fill out meta data.
For categories I have the same description as pages and posts, but it is purely a default. I’m using actual descriptions within my categories. I don’t set up blog categories on the fly, so I can take the time to complete real descriptions for them.
Here is an example of what I would create:
 If you’re wondering where on earth this is accessed and set up, fret not. It is located right within the normal category definition screen. All you have to do is edit an existing blog category and you’ll find this little gem hidden away and ready for usage.
Checking Your Meta Definition
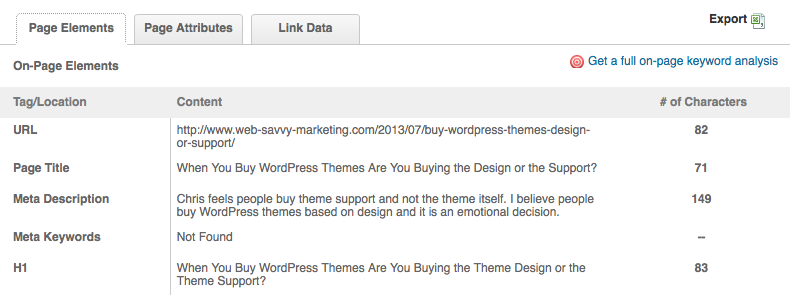
If you configured Yoast as I’ve instructed and you’re probably wondering if you have this all set up right. Thankfully I have a quick little tool that will help. It’s the SEO Toolbox by Moz and I use it just about every day.
Once you install the extension into your browser you can hit a button and see exactly how the search engines would view the content you are viewing. It has helped save me from searching through source code and it quickly points out errors.
Download the MozBar for Chrome ->
![]() Notice that the above image has meta keywords blank. This is by design.
Notice that the above image has meta keywords blank. This is by design.
Search engines no longer use this data for positive ranking. If it is used, it is used as a spam flag.
Thus it is best to leave this field blank.
Creating an SEO Friendly Permalink Structure
A permalink is the manner in which your URLs are created and displayed. The default WordPress installation uses a permalink that assigns numbers to content. Unfortunately that is not user friendly and it’s far from search engine friendly.
While Yoast does have settings for this, the average user doesn’t need to venture in that far. Just go straight to your WordPress admin panel and find Settings -> Permalinks.
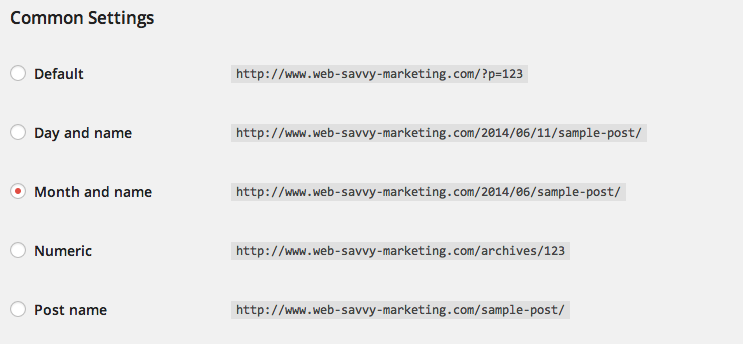 You don’t need to set up a custom structure, just select either Month and name or Post name. This will tell WordPress to assign real words to your URLs and pull these words from your content titles. This improves aesthetics, usability and SEO.
![]() Do not select a permalink structure with categories.
Do not select a permalink structure with categories.
I’ve seen this cause issues with real world blog posts, because people tend to change categories after a post is live. This can change the post’s URL.
If change your content’s URL after it is shared on social media or indexed by the search engines, you will cause visitors to bounce when clicking through to it. Worse yet, you’ll reset your SEO with the search engines, because SEO is based on URL.
If you’d like to go a step further, you can head over to Yoast’s permalink settings under SEO -> Permalinks. You’ll see in the screen shot below, I only have one item checked and this setting is to remove stop words within the URL. I’ll admit, there are days when this setting annoys be terribly. However, it is good to use in most cases so I’ve allowed it and just override it when needed.
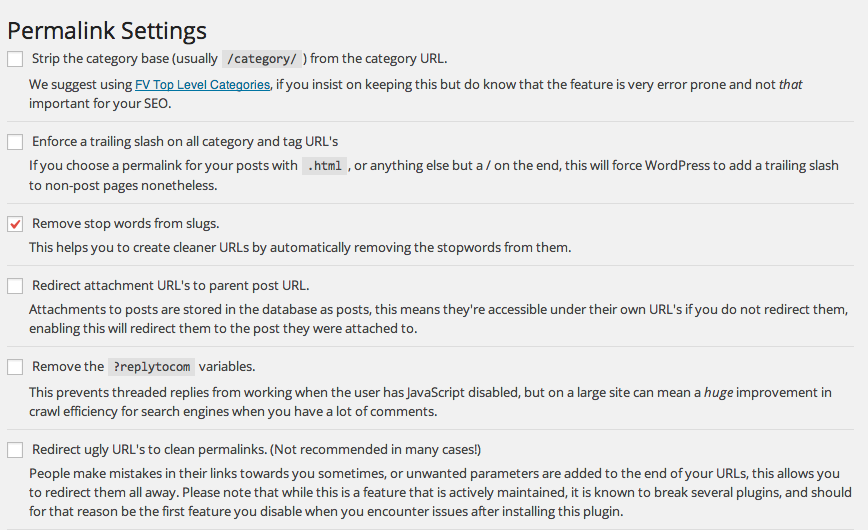
While we could walk through all the other items Yoast offers for permalinks, I think I’d lose 80% of my readers, because the vast majority of you don’t care. And really, you don’t need to care.
Integrating Webmaster Tools
The webmaster tools section of Yoast will allow you to quickly verify your website’s ownership by using the meta codes provided by Google and Bing. This code is given when you add a new URL to Bing or Google’s Webmaster Tools. This option can also help in verifying your site for Alexa or Pinterest or Yandex, although usage is much less important than that of Google and Bing.
To access this part of Yoast, simply go to SEO -> Dashboard within WordPress.
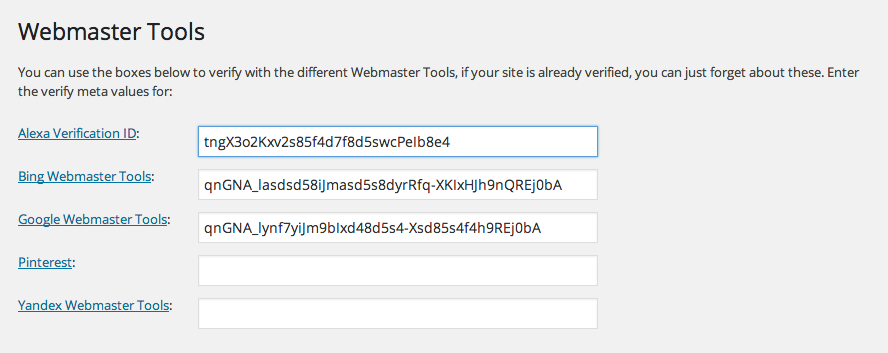
![]() Every website owner should have a verified Google Webmaster Tools and Bing Webmaster Tools account. Both accounts provide valuable data and insight into your website’s health. If you don’t have an account, sign up today and start using it!
Every website owner should have a verified Google Webmaster Tools and Bing Webmaster Tools account. Both accounts provide valuable data and insight into your website’s health. If you don’t have an account, sign up today and start using it!
Creating an XML Sitemap
A proper XML sitemap allows your website to reach out and notify the search engines each time you add or update content. It includes not just a list of content, but the last date of update. It is also updated automatically.
While I’ve seen XML sitemaps manually created, that methodology is not best practice and it will not serve you well for search engine optimization.
To access this part of Yoast, simply go to SEO -> XML Sitemaps within WordPress.
 While there are many XML sitemap plugins available for WordPress, Yoast offers some advantages the others do not. Here are a few things that I love about Yoast’s usage:
- Includes basic data like last update, priority, and change frequency.
- Breaks out the sitemap by content type. This is very helpful in supporting large WordPress websites.
- Pulls noindex data strait from your pages and posts.
- Allows you to quickly include or exclude groups of content by post type or taxonomy.
- Works with custom posts types.
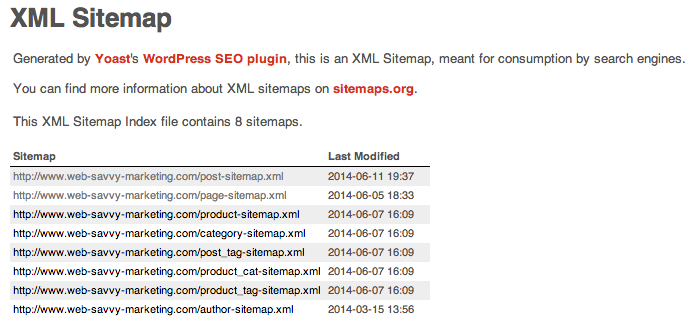
- Uses an XSLT stylesheet so real people can read, digest, and troubleshoot if needed.
Using HTML Sitemaps
An HTML sitemap is a simple page that displays the structure of your website in a hierarchical manner. Visitors may visit this list if they are having problems finding pages on your site.
While Yoast does not create HTML based sitemaps, I’m going to cover them because they are important. A lot of people assume they are no longer necessary and they can be replaced by XML sitemaps. Wrong!
If you have a website of more than 25 pages, you need an HTML sitemap. This is useful for both real people and the search engines.
Here is a quote from Google’s Search Engine Optimization Starter Guide:
“Prepare two sitemaps: one for users, one for search engines.”
The Genesis Framework includes the ability to generate this sitemap automatically via the archive template. If you are not using Genesis, you can add a plugin to dynamically create this for you.
Sharing on Social Media Sites
Inside the Yoast plugin are some handy options for optimizing your social media presence. The three big networks are covered and include Facebook, Twitter, and Google+.
In this area of Yoast, you can turn on:
- Facebook Open Graph meta data – This allows your content to become an integral part of the user’s and their friend’s Facebook activity.
- Twitter Cards – These allow for an expanded version of tweeted content that can include additional content like images.
The Yoast team goes into detail about this in a post specific to social integration. I’d recommend you read through this article, as it has valuable information.
Go Forth and Optimize
We covered a lot of ground today, but not more than can be reasonably managed by a DIY adventurist.
I’d suggest you tackle one item at a time. You don’t need to fix everything today; you just need to have a solid action plan that digs into these WordPress SEO tools.
Don’t forget to check out the Yoast website and sign up for their newsletter. It’s a great way to find out about the latest plugin features and some cool tidbits on SEO.
This is so helpful Rebecca and great timing for me. Thank you!
hello Rebecca
Good effort visible in guiding, i have an input here. I don’t know why these plugin’s mention 70 characters as outer limit while Google serp displays only 55-62( 55 is you are using fonts that carry higher pixels).
Description – I always think deeper when writing description – as it affects CTR, tool will pick up something that will be part of content.
what do you think about the above two points?
thanks
Harish Bali
The Google SERP display was a recent change in March. The old 70 characters is ingrained in my head, since it has been that way for so long. It is possible Yoast has been updated for this and I haven’t even noticed. Thanks for pointing out the omission of that information.
Absolutely agree with you on the CTR for descriptions. I stated the description should be “compelling in nature”, although I could have elaborated further. =)